

Monday, August 31st 2026
The complete Shopify mobile app launch checklist
Written by

Before you launch a Shopify mobile app, get your developer accounts approved, prepare App Store assets and copy, meet the stores' privacy requirements, set an install incentive, write the announcement sequence, load the first campaign, and run a test pass. A launch is largely decided before launch day, and some of these steps have lead times you do not control.
This guide covers what to prepare and in what order: accounts and approvals outside your control, App Store assets and copy, store requirements, website and packaging, email and SMS, social media, the retention setup for the first install, and a final test pass. If you are still deciding whether an app suits your store, see what NAPPS can build. If you have decided, start here.
Start with the reason customers will install
Before you design any asset, answer one question that shapes all your launch copy. Why would customers install?
App growth usually starts with customers who already know you. Your email list, loyalty members, and repeat buyers are the launch audience. Every asset below should give them the same answer to "why install?"
Pick an install incentive:
- Store credit, a common choice among Shopify brands
- A first-install discount, auto-applied in the app
- A loyalty point multiplier on the first app purchase
- Free shipping, unlocked in the app
- Early access to a sale, with app users getting in 24 hours before everyone else
The incentive drives the install and gives the customer a reason to make a first in-app purchase. Decide it now. It will appear in the App Store description, smart banner, launch email, and social posts.
The store credit play
Store credit is popular for a reason. A discount lowers the current price. Credit leaves a balance with the customer that they can spend only with you, which can create a reason to return. Do not assume it guarantees another purchase or a larger basket. Measure it against a discount for your own audience.
Common formats include:
- A welcome deposit. Credit arrives when a customer opens the app and logs in for the first time.
- More credit for app purchases. An app order earns more credit than a web order.
- Refunds as boosted credit. Offer a bonus when a customer takes store credit instead of the original payment method.
Credit also gives you a concrete re-engagement message: an unspent balance.
Accounts and lead times
You control most of this list. Account setup and store review are common reasons launch dates move.
You need two developer accounts, and they should be yours:
- An Apple Developer Program account. An Organization account (the right choice for a brand, since the app is published under your company name) requires a D-U-N-S number for your legal entity. Requesting one is free, but it can add days, and if the details Apple finds don't match your registered company exactly, longer. There's an annual membership fee, and someone with authority to bind the company has to sign the agreement.
- A Google Play Console account. An organization account, with a one-time registration fee, plus identity verification for the account holder.
Two things matter here. First, open both accounts in your own name, not your app provider's. If a vendor publishes your app from its account, moving providers can mean a new listing with no ratings or install history. Second, start early. Setup may take an afternoon or several weeks, and the work cannot move through store submission until the accounts exist.
While you're at it, two pages on your website are hard requirements for both stores, and both need to be live before submission:
- A privacy policy, publicly reachable at a stable URL
- A support or contact page, same
Budget for review. Apple and Google review a first release, and neither guarantees a turnaround. Leave one or two weeks between "the app is finished" and "the app is live." Do not schedule the announcement email until the app is approved and released. For many brands, kickoff to live takes about six weeks.
App Store assets and copy
Your App Store and Google Play listing may be the last page someone sees before installing. Treat it like a landing page, not a formality.
What you need ready:
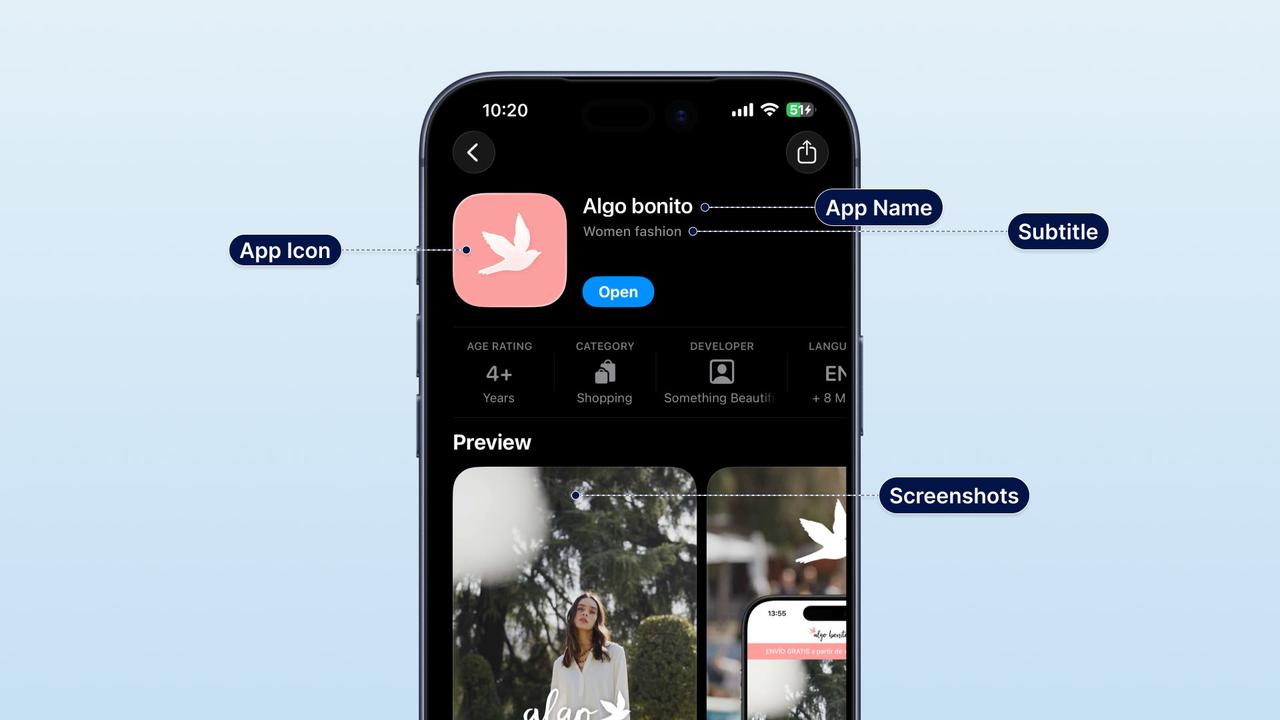
| Asset | What good looks like |
|---|---|
| App name | Your brand name, plus an intent keyword where it fits naturally |
| Subtitle / short description | One sharp line on the benefit, not "the official app of...". Both stores cap this tightly, so write to the shortest limit and reuse |
| Screenshots (5 to 8) | Lead with benefits such as exclusives, faster checkout, or loyalty. Do not lead with empty UI. |
| Description | Benefit-led first paragraph, then features. Your install incentive up top |
| App icon | Your mark, legible at small sizes, consistent with your brand. Square, no transparency, and no rounded corners of your own: the stores apply their own mask |
| Feature graphic (Google Play) | A banner at the top of the Play listing. It is required for Android and easy to overlook. |
| Keywords | Your brand terms plus category intent terms |
Two things brands often miss:
- The listing is never "done." Most brands set it once at launch and don't touch it again, which leaves installs on the table as the app evolves. Plan to revisit it.
- Localize it if you sell in multiple markets. Many app builders don't let you fully customize or localize listings, so a brand selling in five markets ships one generic page to all of them. If you sell in five languages, prepare five listings.
For the listing itself, use App Store Optimization for Shopify brands. Before submission, check how to fill in your app store listing without getting rejected.
What the stores require before they'll approve you
Brands often prepare listing copy first and leave declarations too late. Each needs input from someone who knows what the app collects:
- Privacy policy URL and support URL. Both required, both checked, both need to resolve.
- Apple's App Privacy details and Google's Data Safety form. Declare what data the app collects, why, and whether it is linked to the customer or used to track them. Include every SDK in the build, not only your own code. Ask your provider for the list rather than guessing.
- Permission purpose strings. Every prompt (notifications, camera for scanning, location if you use it) needs a written reason the customer sees. Write these in your brand voice; they're customer-facing copy, not boilerplate.
- An ATT prompt, if you track across apps. The requirement depends on your data flows. Learn what triggers it in App Tracking Transparency for e-commerce apps.
- In-app account deletion. If customers can create an account in the app, they must be able to delete it from inside the app. A support email address is not sufficient.
- The content rating questionnaire, on both stores. Straightforward for most commerce catalogs, and a specific problem for regulated categories.
Decide these before you submit, not during review. Every round trip with a reviewer costs days you'd rather spend on the announcement.
Set up your website to drive installs
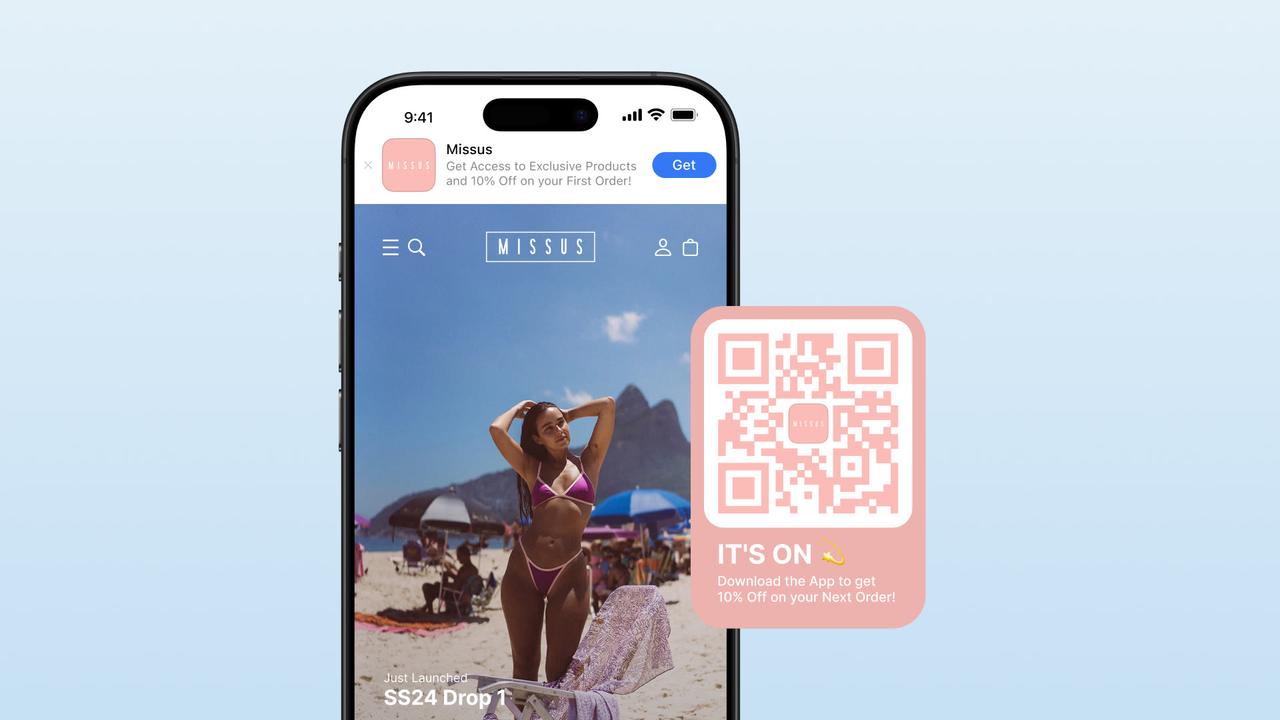
Once the app is live, your website can become the largest install source. Set up these three tools before launch:
- Smart app banner (mobile). Prompts mobile visitors to open the app if it's installed, or download it if it isn't. The copy matters: make the value explicit.
- QR code (desktop). Desktop shoppers can't install a phone app from a computer. A QR code hands them to their phone, where the smart banner takes over.
- Deep links. When someone taps a store link and has the app installed, send them to that exact app page rather than mobile web.
Copy rule for the banner: "Get 10% off in the app" converts better than "Download our app." Lead with what they get, not what you want them to do.
Do not forget offline placements
Every order you ship reaches a customer who has already bought from you. Prepare these alongside digital placements:
- A QR code on your packaging insert, with the incentive on the card: the same "get [incentive] in the app" line, not just a logo and a code
- A line on your order confirmation and shipping emails, where open rates are far above marketing sends
- In-store signage and receipts, if you have retail, and a one-sentence script for staff at the till
- Your printed catalog or lookbook, if you run one
These need lead time from your print supplier, which is why they belong on a pre-launch list rather than a nice-to-have list.
Email and SMS announcement sequence
Your CRM is the most direct line to your best download prospects. Don't send one generic blast. Build segments, and give each a specific reason to install:
| Segment | Message angle |
|---|---|
| Repeat web purchasers | You shop with us often; here's the faster way, plus [incentive] |
| Recent first-time buyers | Faster checkout, order tracking, and [incentive] on your next order |
| Loyalty members | Your points, front and center, plus a point multiplier in the app |
| Engaged non-buyers | Early access and app-only offers as the reason to commit |
A simple sequence is a teaser before launch, a launch announcement with the incentive, and a reminder to non-installers a few days later. Every message should answer two questions: why install and why now?
Write these before launch week. The announcement email is the single highest-impact send of the quarter, and it deserves better than being drafted the night before.
Use social media to support the launch
A short-form video can focus attention on the launch. You do not need to be a content-first brand. Make the install incentive and the app's value clear in the first few seconds.
Content angles to prepare:
- The announcement video: what the app is, the install incentive, where to get it
- Exclusivity teasers: what will only exist in the app (drops, prices, early access)
- Behind-the-scenes: building the app, picking the icon, the team's first order
- Launch-day countdown: stories or posts in the final days
You can lock the app behind a password before launch. It can work as a members-only preview. Use it for the app, never the website. A password-gated storefront blocks shoppers who are ready to buy.
Retention setup for day one
The most common launch mistake isn't a weak announcement. It's launching acquisition with nothing behind it. These need to be running before your first install arrives, not six months later:
- Push opt-in, built into onboarding. The opt-in prompt is your one big chance; every opt-in compounds for the life of the channel. Your push program starts here.
- Welcome series, introducing the app's benefits and nudging the first purchase.
- Abandoned cart and back-in-stock automations, your two highest-intent triggers.
- The first app-exclusive campaign, loaded and ready for launch week. Exclusivity turns downloading into a value decision instead of an effort decision.
- Cohort tracking, app vs online storefront, so you have a baseline from day one.
Based on NAPPS customer data across active customers, brands that actively run push, loyalty, and app-exclusive content see 15% to 45% of online revenue shift to the app in the first months. This is an observed result for brands that had their retention setup running from the first week, not a guarantee. See what to expect in your first 90 days with a Shopify mobile app for the next phase.
Test it before you submit
Ask your provider for a test build and put it on real devices, including at least one older phone. Then work through the flows in the order a customer would:
- A real purchase, end to end. Every payment method you offer, a discount code, a gift card, and a subscription if you sell them. Then check the order lands in Shopify looking exactly like a web order, correctly tagged as app.
- Push, on both platforms. Opt in, receive a test send, tap it, and confirm it opens the right screen rather than the home tab.
- Deep links from the places you'll actually use them. Tap a link in your announcement email, in an SMS, and in a social profile. All three should open the app to the exact page when it's installed.
- Analytics events. Confirm the events you'll report on (install, first open, add to cart, purchase) arrive in the tools you'll read them in, with revenue attached and matching Shopify.
- Purchase deduplication. An app order can be counted by the app SDK, analytics, ad platforms, and Shopify. Agree on the source of truth for app revenue before launch so the day-one baseline is usable. Use the mobile app metrics for Shopify brands guide to set that baseline.
- Accounts and sessions. Log in, close the app, reopen it, and confirm the customer is still logged in with their history intact. Then delete the account, since you had to build that anyway.
- Bad conditions. Weak connection, airplane mode, a fresh install with an empty cart. The app should degrade politely rather than show a blank screen.
Have someone who didn't build the app do this pass. The people closest to it stop seeing the rough edges.
Launch day
Launch day should be routine because the work is already done:
- Release the approved build (or let a scheduled release fire). Confirm both listings are live and searchable by your brand name, which can lag approval by a few hours.
- Turn on the smart banner and QR codes, then load a product page on your phone to check the banner appears.
- Send the announcement, in the sequence you already wrote, and post the launch video.
- Watch three numbers: installs, first opens, and first orders. If installs arrive but first opens don't, the problem is your store listing. If first opens arrive but orders don't, it's onboarding.
- Brief support on what the app does, the incentive, and how to help someone who can't find it.
- Reply to the first reviews, including the unhappy ones. Early ratings shape your listing's conversion rate for months.
- Send the reminder to non-installers a few days later, once you know the app is stable.
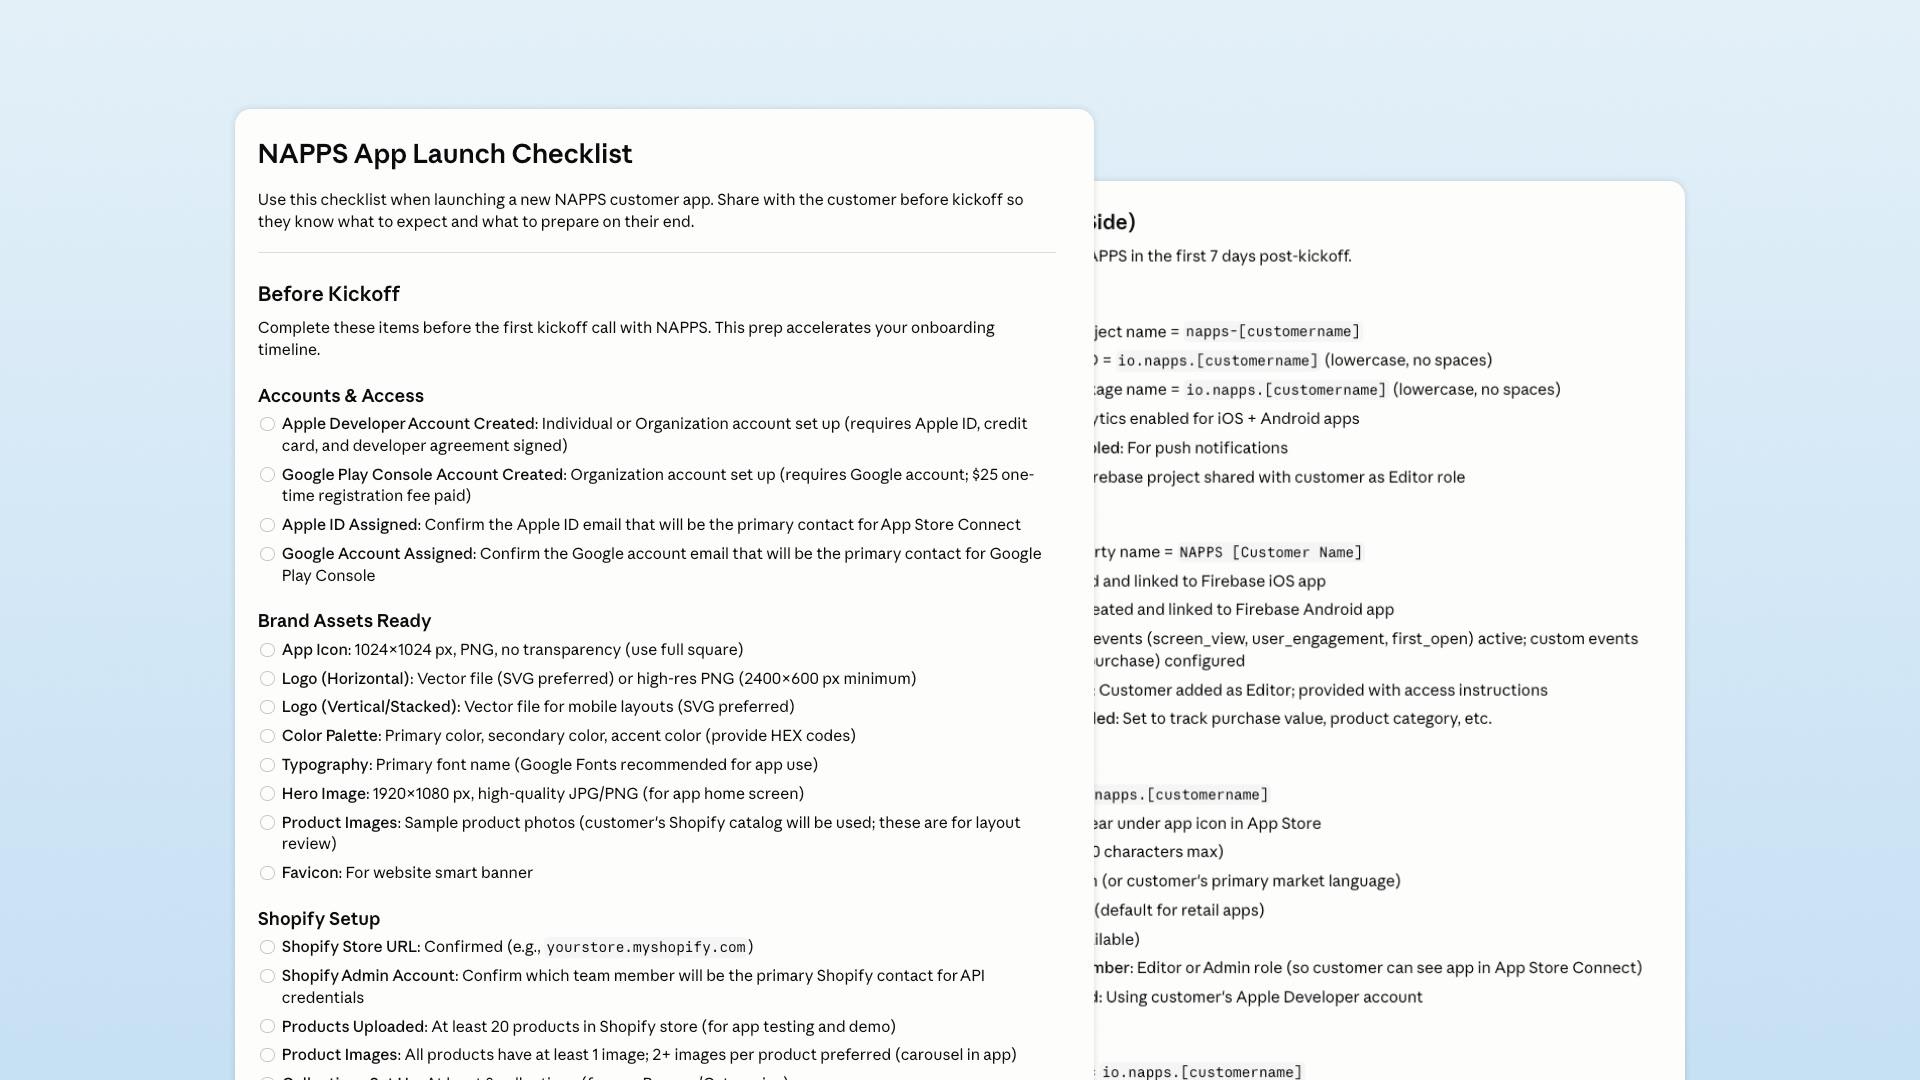
The full checklist, one page
Strategy
- Install incentive decided (store credit, discount, points multiplier, free shipping, or early access)
- Launch audience segments defined in your CRM
Accounts and lead times
- Apple Developer Program account opened in your company's name (D-U-N-S number requested if needed)
- Google Play Console account opened in your company's name
- Privacy policy and support page live on your website
- Review buffer built into the launch date, announcement not scheduled until the app is approved
App Store
- Name, subtitle, and description written (incentive included)
- 5 to 8 benefit-led screenshots and app icon ready
- Google Play feature graphic ready
- Listings localized for every market you sell in
Store requirements
- App Privacy and Data Safety declarations completed, covering every SDK in the build
- Permission purpose strings written in your brand voice
- ATT prompt in place if you track across apps
- In-app account deletion available
- Content rating questionnaires completed on both stores
Website
- Smart app banner live, with value-explicit copy
- Desktop QR code placed
- Deep linking enabled and tested
Offline
- QR code and incentive on packaging inserts (ordered with print lead time)
- App line added to order confirmation and shipping emails
- In-store signage and a staff script, if you have retail
Email and SMS
- Teaser, announcement, and reminder emails written per segment
- Send dates scheduled around launch day
Social
- Announcement video planned and shot
- Exclusivity teasers and countdown content queued
Retention engine
- Push opt-in flow configured in onboarding
- Welcome series, abandoned cart, and back-in-stock automations on
- First app-exclusive campaign loaded
- App vs storefront cohort tracking set up
Tested on a real device
- Purchase tested end to end, order correct in Shopify
- Push received and opens the right screen
- Deep links tested from email, SMS, and social
- Analytics events arriving with revenue attached
- Source of truth for app revenue agreed (purchase deduplication)
- Login, session persistence, and account deletion checked
- Older device and weak-connection pass done
Launch day
- Build released and both listings confirmed live
- Smart banner and QR codes switched on and verified
- Announcement sent and launch video posted
- Installs, first opens, and first orders being watched
- Support briefed, first reviews answered
How NAPPS fits in
NAPPS, a native mobile app builder for Shopify and Shopify Plus brands, ships most of this checklist as part of the platform. Your App Store listing is set up at launch (AI-drafted copy, your brand assets, ready-made screenshots) and published on your own Apple and Google accounts, so you own and can update every detail in any market. The smart app banner, desktop QR codes, and deep linking are built in with impression, click, and install tracking. Push is unlimited on every plan, app-exclusive campaigns run through Campaign Launcher, and direct integrations with Klaviyo (all plans) or Ometria (Enterprise) let your install emails segment on real app behavior.
We also run the submission itself: the store questionnaires, the privacy declarations for every SDK the app ships with, and a test build you install on your own phone before anything goes live. You still own the accounts, so nothing about the listing depends on us afterwards.
And the preparation window is free: the app costs nothing until you're ready to publish it. You can work through this entire checklist, see the finished app, and only commit when launch day is real.
Frequently asked questions
Developer accounts in your own name on both stores, an install incentive, an optimized App Store listing (name, subtitle, screenshots, description, Play feature graphic), the store declarations (privacy policy and support URLs, App Privacy and Data Safety, permission strings, in-app account deletion), your website and packaging wired with a smart banner, QR codes, and deep links, a segmented email/SMS announcement sequence, launch content for social, a retention engine running from day one, and a test pass on a real device before you submit.
Plan around six weeks from kickoff to live, and note that the parts you don't control sit at both ends. Opening an Apple Organization account can take days or weeks depending on how fast your D-U-N-S details clear, and both stores review a first release without guaranteeing a turnaround. Build the app while the accounts are being set up, and don't schedule the announcement until the release is actually approved.
Benefits, not blank UI. Lead with what the customer gets: app-only offers, faster checkout, early access to drops, loyalty points. Each screenshot should make one clear claim, with the strongest one first, since many visitors never swipe past it.
Segment first. Give repeat buyers, recent first-timers, and loyalty members each their own reason to install, and anchor every message on your install incentive. A teaser, a launch announcement, and a follow-up reminder to non-installers outperforms a single generic blast.
Convert the audience you already own. Your email and SMS lists, website traffic (smart banner, QR code, deep links), and social following reach customers who already trust you. Paid App Store search ads are an optional extra, not a requirement; existing-customer conversion is cheaper and more reliable than paid net-new installs.
The bottom line
A mobile app launch needs coordination. Use one incentive consistently across the App Store listing, website, inbox, social feeds, and stores, and land customers in an app that is ready to bring them back. The list keeps the launch from becoming a rushed upload.
Get your launch plan right before you publish
We'll review this checklist against your store, audience, and launch date in a 20-minute call.
Book a 20-minute callKeep reading
October 27, 2026 - 10 min read
4 MobiLoud alternatives for Shopify: pricing and fit


October 23, 2026 - 8 min read
Tapcart vs Shopney: pricing, features, and which fits your Shopify store
September 18, 2026 - 13 min read
Tapcart Alternative: NAPPS Pricing, Features & Migration